
3 Simple Steps to Build a Remarkable Prototype
Whether you have an innovative idea for a physical product, a digital product or a service, you can always develop a prototype to test its feasibility. These days, prototyping is inexpensive and doesn’t necessarily require a lot of technical know-how. In this article, I will share 3 simple steps that you can follow to prototype literally anything.
Prototyping is an important part of the modern (agile) innovation process. It allows you to test your assumptions, to turn a vision into something tangible, and to refine your ideas and explain them to others. Although prototypes aren’t (and shouldn’t be) perfect, they help to explore and improve your ideas.
People love to interact with prototypes. If you have something tangible to show, all eyes and ears will be on you. If you have made the effort to build something, you will definitely get the attention of clients, your CEO, and perhaps some investors. When you’re armed with a prototype, people will take you and your idea more seriously. Think about it. Whom would you rather listen to? Someone with a rough sketch on the back of a napkin, or an innovator with a ‘3-D version’ of his or her idea?
Concrete ideas
Managers have the tendency to keep their ideas vague. Although it’s valuable to keep your options open, it’s not enough to generate implicit strategies. If you want to innovate, you will have to turn abstract suggestions into concrete proposals.
Too often I see people hide behind abstraction, to cover up the lack of creative ideas. By keeping things vague, and by applying rhetoric frameworks, it becomes hard for other people to judge these ideas properly. It’s hard to come up with arguments against an idea when you don’t fully understand the idea in the first place.
1. Draw a flat prototype
Sketching your idea is the first step in making your idea tangible. Words are ambiguous and can be confusing. An image, however, is understandable, and worth a thousand words. For other people, it’s easy to react to a sketch and to build upon it. Drawing is a great way to capture and explain the essence of your idea. A drawing of an idea can be useful for yourself, as well as for the people you’re working with.
Don’t worry. You don’t need to be Leonardo da Vinci to make a good drawing. Everybody can draw. Visual thinking doesn’t require any artistic talent at all. If you can draw a line, a circle, a square and a triangle, you are perfectly capable of explaining yourself with a quick sketch. It’s totally fine if your sketch is messy, incomplete or ugly. As long as it is clear and helps you to get your ideas across.
Key visual (for a physical product)
This technique is commonly used in the creative industry to quickly present and judge ideas. The objective is simple: explain the essence of your idea in one ‘key visual’.
Needless to say, not every idea can easily be turned into one self-explanatory sketch. However, having only one image to explain yourself, forces you to make choices. It gives you a good sense of how ‘simple’ your idea really is. Simplicity is often a good indicator of a great idea. (Do people grasp your idea, without your verbal clarification?)
Magazine Ad
You can also make the key visual more detailed. You could, for example, create a ‘magazine ad’ for your new product. How would you advertise it to your future customers? What visual (and what features) would grab their attention?
App Screens (for a digital product)
A quick way to draw an app prototype is by sketching it directly into an ‘app mockup’. Print the outlines of a smartphone on a large piece of paper, and draw the different ‘app screens’. If you are developing a website or desktop application you can use ‘wireframes’.
Try to find a logical flow and user interface. How would it work? What buttons do you need? What does a user see? What can a user do? etc.
Storyboard (for a service)
This method is especially useful when you want to prototype a service. Draw a storyboard of how stakeholders will interact with your service. Draw what they do, and fill it in with what they say, think and feel. Turn your customer’s journey into an engaging comic story. (Don’t overdo it, draw just enough to explain how people will engage with your service.)
2. Build a tangible prototype
Now you have explored your ideas on paper, it’s time to build a handmade, 3-D non-working prototype. Your objective is simply to build a cheap and tangible version of your idea. This way you go one step further than your line-drawing and ‘paper reality’. Your prototype in this phase should be nothing more than an inexpensive demonstration of your idea in a physical way. By building a 3-D version, you might also stumble upon flaws in your idea that you might not have discovered by simply looking at a flat drawing.
You are allowed to use anything you want to turn your idea into a prototype. Inexpensive household items are perfect prototype materials. E.g. think about foam, cardboard, tape, paperclips, glue, empty milk containers, toilet rolls, paper, aluminium foil, etc.
Your prototype still doesn’t have to ‘work’, its main goal is to function as a mockup of your idea. A non-working prototype enables you to investigate the shape and size of your idea. It will give you a better understanding of how your product (or service) would look and work in real life.
Your prototype doesn’t have to be perfect or look pretty. However, It should resemble, and function, as your (final) product or service as much as possible.
Prototyping kit (for a physical product)
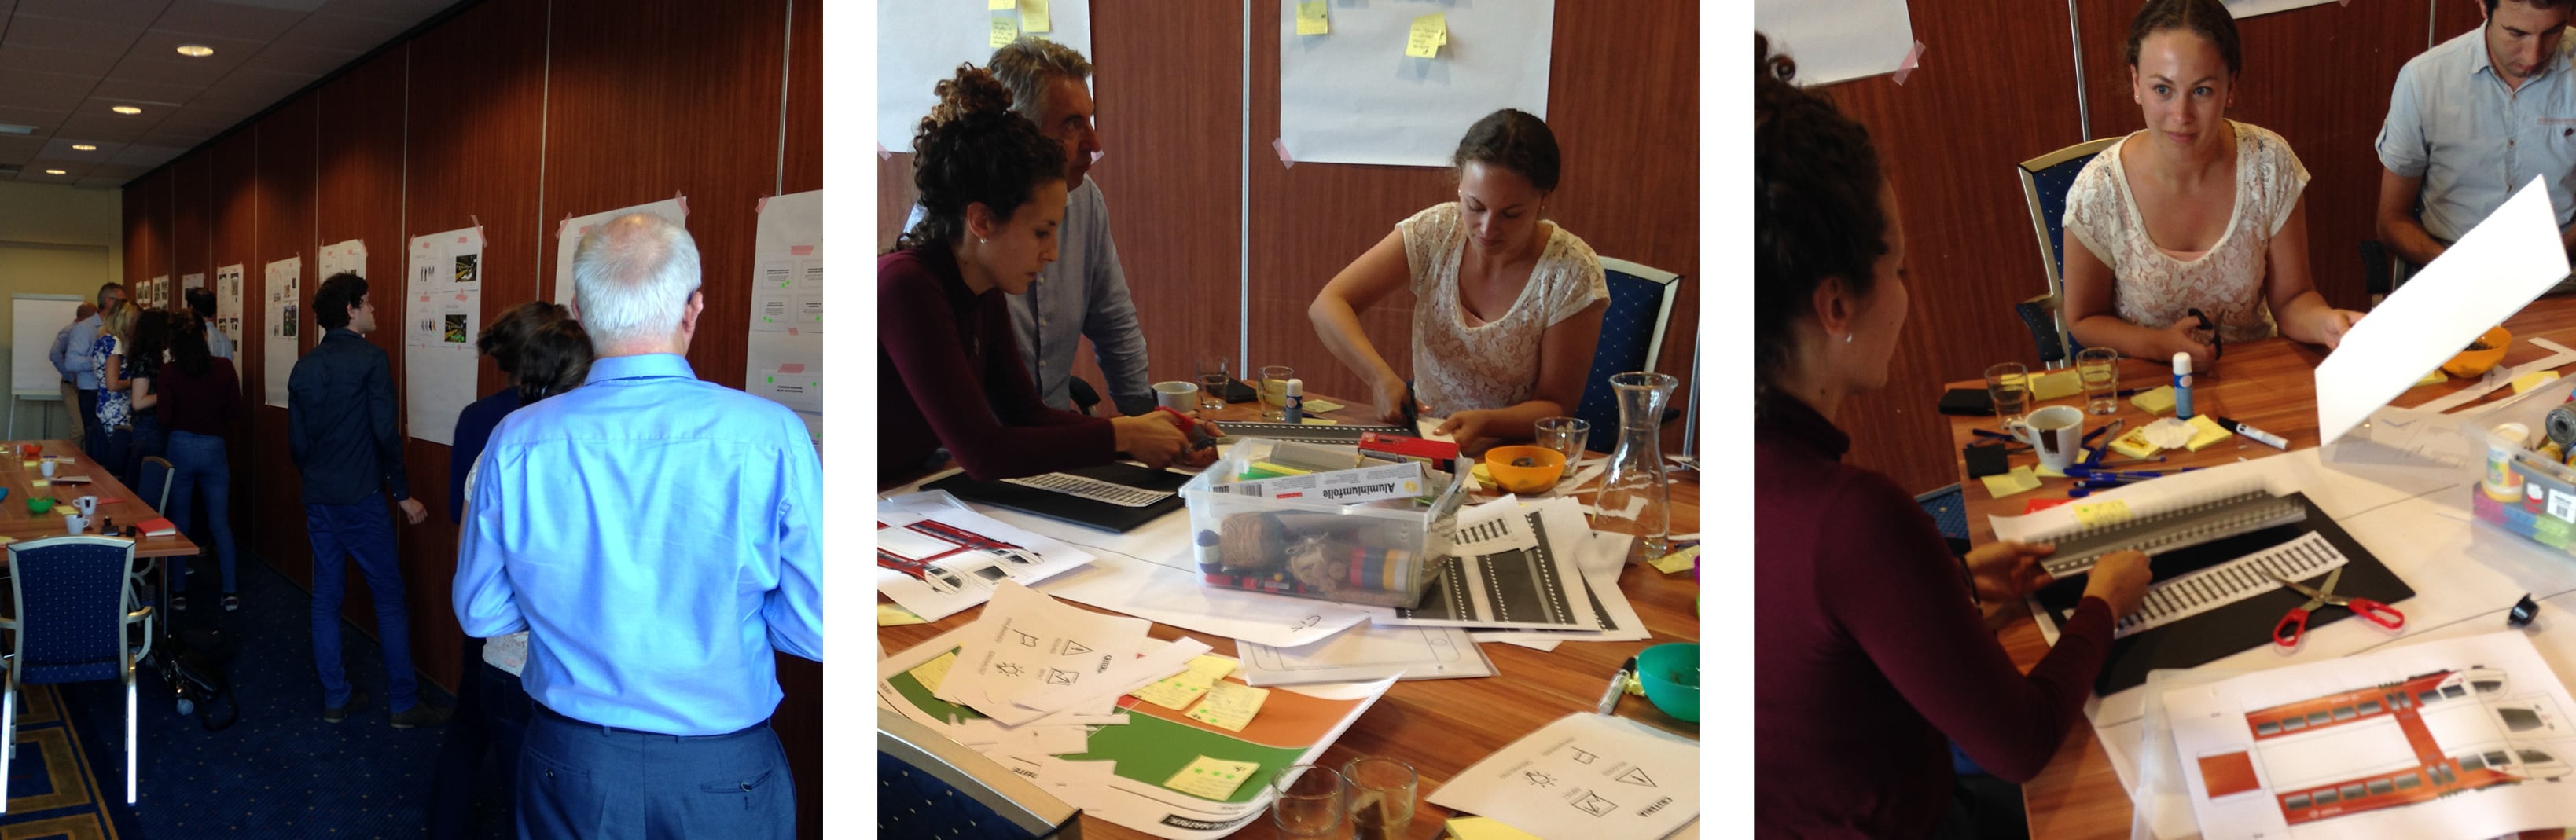
If you want your team to build a prototype directly after a brainstorm session, make the necessary preparations. At HatRabbits for example, we have our own prototyping kit, with all sorts of materials people can use to build their prototypes with. Of course, you should give people the freedom to use whatever they can get their hands on. However, you don’t want your team to lose too much time hunting for the right building materials.
Besides arranging the necessary equipment, it’s also advisable – especially when there is a limited amount of time – to have some basic items prepared (e.g. satellite images, miniature models, logos, specific shapes etc). This is especially useful when you work with a specific subject, or with a preset framework. It allows your team to focus on prototyping their ideas, instead of losing themselves in decoration trivia.
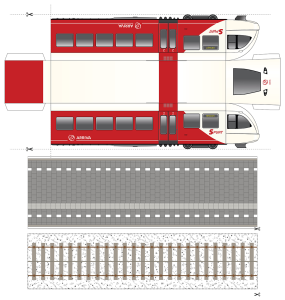
Recently we organised a ThinkTank for the Dutch province of Gelderland and several railway companies, to solve a problem with boarding and exiting trains. Besides our HatRabbits prototyping kit, we also created paper cut-out train models, rails and platforms beforehand, so participants could rapidly build a miniature rail station. The video below gives a short impression of the prototyping part of the session.
Materials
If it’s clear what you want to build you can also choose to make use of very specific prototyping materials. Take Shapelock for example. This plastic is reusable, non-toxic, paintable, easy to saw and super tough. After heating it to 150 degrees Fahrenheit (65 °C), it becomes easily shapable by hand. Completely cooled down it becomes a super strong plastic, similar to Nylon or Polypropylene in toughness. Making it an excellent material for strong plastic prototypes.
Animation
Besides building a real object you can also choose to create a digital 3-D model. A corresponding video animation of your model can provide you with some useful insights. It will also be much easier to turn your idea into a real product if you already have a (CAD) model on your computer.
There are a lot of professionals who could help you to create a 3-D model. If you want to design it yourself you could use programs like SketchUp, a simple straightforward software tool to build 3D objects.
Prototyping Software (for a digital product)
If you are developing a digital solution I recommend you do some research on ‘prototyping software’. There are some amazing tools available. Personally, I am a big fan of InVision, but there are dozens of other great and affordable tools available. What is best for your situation depends on your product and the key objective of your prototype.
If you are not familiar with Photoshop, yet you love Keynote, you could choose Keynotopia. And if you just want to make your ‘App Screen’ sketches interactive, you could use POP (Prototyping on Paper).
Just keep in mind that you need to build something quickly. Don’t worry about the details (like creating icons, choosing fonts or picking the right colours).
Pick a Moment (for a service)
In this phase there are a few things you can do, to make a more lively prototype than just a sketch or storyboard. Although it can be hard to prototype a service, especially if your service is complex. it’s always possible. Or at least partially. You could for example prototype a specific moment in your ‘customer’s journey’.
Act a scene
‘Role play’ is a great way to run a future scenario, and to experience what a service could be like in real life. Gather a few team members, set up a stage and create a simple script. Depending on your service you can add props to make it look more realistic. Of course, you can choose to film the play, so you have something to show to people afterwards. If you’re not comfortable with acting, you can also choose to hire professional actors. Of course, this makes the whole procedure a bit more expensive.
Table Top Video
Creating a video animation is also a wonderful way to demonstrate your idea. An animation format which is perfectly suitable for that purpose is ‘in Plain English’. Write a script, keep it simple and try to explain your idea in a 30 to 60-minute video.
3. Develop a working prototype
This last step is about creating a working (or real-looking) product or service. In this step, you could also try to build your minimum viable product (MVP). The first version of your product/service that customers are already willing to pay for.
It’s all right if your product is still not entirely finished, as long as your ‘customers’ have the feeling that your prototype works, and that it’s valuable for them. This way you can test your idea and collect feedback, while already earning a bit of money with it.
We once spoke with the CEO of a large Dutch software company, who told us, that while he was selling to his clients the proposition of a ‘complex algorithm’, in reality, he was manually arranging everything overnight. As long as you can deliver the value that you promise, it’s fine to make use of band-aid solutions.
Keep it simple (digital product)
Create a list of the most important features that you want to include in your product. Approximately 20 features should be fine. Choose the 5 most essential features and try to turn them into a prototype. Again it all depends on your product. Some ideas are easier to prototype than others. Decide how you can build a credible prototype. Do you need to outsource or can you build it yourself?
For most organisations, it’s probably best to ask for some outside help at this stage. If you do want your own team to work on a realistic prototype, there are a few cool tools you can use to rapidly build high-quality prototypes. To name just a few; Mockplus, Sketch, Proto.io, Framer, Origami, Principle, Atomic, Prott, Webflow and Marvel.
3-D Printing (physical product)
Although it’s obvious, I still want to mention it. 3-D printers are getting more and more affordable. Especially if you are into creating physical products, a 3-D printer could be a good investment. If you don’t want to buy a printer yourself you can also send your model to a 3-D print shop, where they will print it for you. The Dutch Start-up Hubs helps you find and order at privately owned 3D printers nearby.
Brochure (service)
A simple way to prototype your service (or product) is by creating a real-looking commercial leaflet for it. Develop an advertising brochure that contains all the important information about your service. This way you can swiftly show something tangible to your customers without having to go through too much hassle.
How to turn a service into a real working prototype depends on your idea. Keep in mind that the most important objective of your prototype in this phase is to put your ideas and assumptions to the test.
What assumptions need to be true to turn your service into a success? (e.g. is the problem you solve really worth a business solution? Are people willing to pay for your service? Do people understand your service? Do customers need to give up or arrange certain things for your service, and are they willing to do so? etc.)
I hope that this article was helpful to you. Prototyping requires a lot of creativity. Every idea will require its own approach. Do you have other ideas or suggestions on how to build a prototype? Or do you have any comments on my article? Please let me know in the comment box below.
Need help with prototyping?
Would you like to know what we can do for your organisation?
Contact us via [email protected]


Uitvoerig maar zeer compleet stuk, Jeroen. Goed werk. Ben zelf nog niet overtuigd van InVision, misschien kunnen we hier nog eens over praten.
Thanks Gerard, It’s great to hear you love my article. Yes, indeed I tried to write a detailed piece about prototyping, including guidelines and practical tools that I find useful. I’m aware that it’s a long read 😉
To answer your question. The reason why I like InVision so much, is because you can create hotspots (buttons or effects) and synchronise Dropbox files. This way you can swiftly turn Photoshop documents into live interactive prototypes. (This means that if you change and save one layer in Photoshop, it will also be changed in your entire prototype. Saving you a lot of time.) If you have a paid version you can run multiple prototypes, collaborate with a large team and give your feedback directly on a prototype.
As I mentioned above, I my article, there are a lot of cool tools available, and there are definitely some great alternatives. I guess InVision is especially useful when you are a designer who loves to create ‘pixel perfect prototypes’ from scratch.